
DIY - HOW TO: Replace Passenger Seat Airbag Occupancy Sensor
DIY - Replace Passenger Seat Airbag Occupancy Sensor
Working time: 4 hours total. That included a one hour trip to Walmart to purchase a 10.00 rivet gun necessary for the project (and some eggs). It also included 30 minutes as a side project to repair a fiddly "height up/down" switch on the same seat as well. This DIY was written from memory so please don't blast me if i left a step out.
I have seen on the Forum that this job has been quotes as high as 5k to repair. I personally was quoted 10 hours labor and at 150.00 an hour that's 1,500.00 that I feel like I could save if I went the DIY route. I will still have to pay homage to 'Mother McLaren' to reset the light once I'm finished, but that's only one hour of labor.
So I bought the Passenger Seat Airbag Occupancy Sensor repair kit from the dealer for around 200.00 and got to the task of doing it myself around 9:00pm last night. This was my first time tackling a McLaren seat, but I was actually surprised that it was not very difficult to take apart and reassembly.
Prior Lesson Learned working on a McLaren! (I learned this reading McLaren Life)- If you ever intend to unplug a seat, the rear view mirror, most any Body Control Module, the Airbag Module... (well you get the point), then you should first disconnect the battery to avoid a 150.00 visit to the dealer to have your airbag light turned off.
Because my airbag light is already on, I did not take this precaution, and leaving the battery connected made it easier to move the seat back and forth during removal and re-installation.
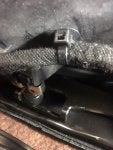
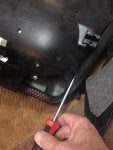
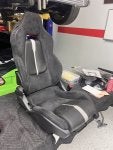
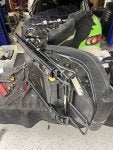
1) Remove the 4 bolts holding the passenger seat using a Torx T40. leave the power cord connected to the back of the seat while you do this so you cna move the seat around.
2) Remove the seat completely from the car. It will come out a couple of different ways, the important thing to consider is to protect the center console and the dash from the metal seat rack as you put the seat in and out of the car. We are working to make the car better, so let's not make any mistakes like scratching that beautiful dash!
PS- Be sure to keep a mental note of you movements and the seat orientation as you are removing it, installation will be the reverse of this movement so don't forget how you did it.
3) Once the seat is out of the car, remove the Seat Belt from the seat using a 15mm Socket. I recommend to take a picture of the belts orientation (twist of the belt) before removal so you can reinstall it correctly the first time you put it all back together.
4) Move your work area to a nice relaxing air conditioned area. For me the perfect spot was the living room rug. No worries of scratching the seat back or the leather, and I told my wife we were still having family time and I was not just working on my cars again.
5) Open your Occupancy Sensor repair kit and lay out all of the parts. you will not need everything, primarily you will not use the new wiring harness, so set it aside and just focus on using your existing harness.
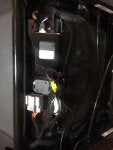
6) Take more pictures of everything under the seat and how it is all connected before the tear down. This will ensure reassembly will be easy if you forget where something goes. Plus pictures give you bragging rights when you tell your friends you have zero fear at tearing apart things that cost over a quarter of a million dollars.
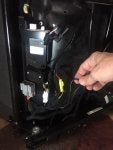
7) unplug all of the electrical connectors under the bottom of the seat. You do not need to unplug the two motors that have cables driving the seat forward/reverse track.
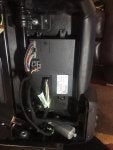
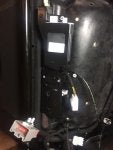
8) Using a Phillips head screw driver remove the large ECU under the seat, then remove the electric "Seat Control Unit" using a Torx T20 tool.
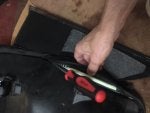
9) Use a flat tipped screw driver to gently pry the wiring harness off the seat bottom.
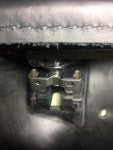
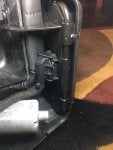
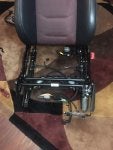
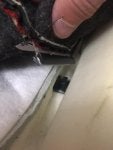
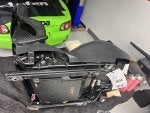
10) Once you have everything disconnected from the seat bottom you will see two silver clips on the seat bottoms "pivot points". You need to pry both of those clips off and then you can remove the only two Allen Head bolts that are screwed directly into the seat bottom. At this point you can remove the seat bottom from the seat frame.
Random Interesting Point: I weighed my heavy electric seat and it was approximately 37 lbs (wish I has 675LT light weight seats!)
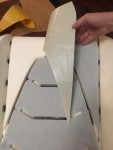
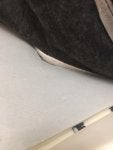
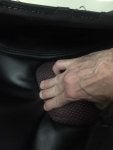
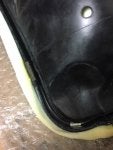
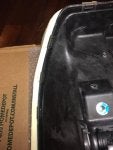
11) Working on the seat bottom itself completely removed from the metal seat frame, use a medium size flat tip screw driver to pry up the plastic edge sewn to the leather that is pushed in to the perimeter of the plastic seat bottom (see pics for a better idea of this step)
12) IMPORTANT - Once you pry up the plastic edge sewn into the entire perimeter of the leather, you will notice approx 20 metal clips all around the plastic seat frame. Go ahead NOW and transfer all of those clips to the same locations on your new seat bottom. If you don't, the leather will not 'stay put' on the new seat bottom (Ask me how I know. LOL)
13) You should have the leather free from the the seat bottom. Now flip it over and using your flat tip screw driver to gently pry the U shaped plastic clips on each side of the foam cushion where it is connected to the back side of the leather. Don't worry if you accidentally tear the U shaped clips out of the foam cushion because the old one is destined for the garbage bin anyway. In the center of the seat you will find Velcro is used to give the seat contour lines something to keep attached to. Just pull up, and the leather should be freed of the old seat bottom. Remember to snap a few pics to brag to your buddies later. I tried it with my spouse, but she just rolled here eyes. ��
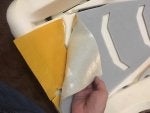
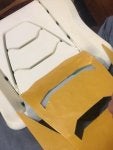
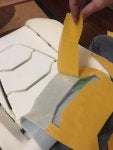
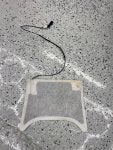
14) Take a few minutes and study the old seat. It has two layers of electronics glued to the foam. The top layer is the Airbag sensor. the layer under that is the seat heater mat. The seat heater mat is gray colored and the occupancy sensor is white. Please study the alignment of how they are glued down carefully because you will only have once chance to stick yours on correctly. I noticed that there are four distinct panels in the seat cushion and the sensors have to be flexible in between each panel. In these ares you will need to 'bunch' the material closer rather than just laying it out flat. Please review my pictures if you are unsure of what I'm describing.
15) Install the larger gray seat heater mat first. Only peel off the tape backing on each area you are working.
16) Now install the smaller white seat occupancy sensor mat on top of the seat heater mat. Only peel of the tape backing on each area you are working on. Be sure your wires go thru the hole in the seat bottom just like the old unit we removed.
17) Once both electric mats are glued to the cushion, we can now reinstall your leather cover. Start by inserting the white Velcro seat contour areas in the middle, then snap in the plastic clamps on each side. Next flip the seat bottom upside down and push the plastic edge sewn to the leather back into the perimeter of the plastic seat bottom.
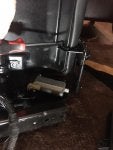
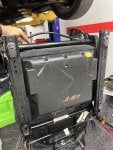
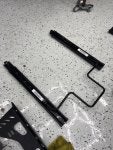
18) Assembly the two new small ECU boxes received with your kit to new the metal bracket received with the kit. Just copy how the old one was set up on the old seat.
19) Using your rivet gun and the three supplied rivets, attach your new rectangular metal bracket to the seat bottom. You will find a few new plastic bushings that snap into the seat bottom at the two pivot points and also at the Allen head bolt points.
20) you can now reconnect the new seat bottom to the seat frame. Once aligned properly you can snap the metal C-clips back to the pivot points and then bolt back in the two Allen Head screws.
21) reattach all of your wiring harness clips, attach the electric "Seat Control Unit" and the seat switch assembly.
22) DOUBLE CHECK YOUR WORK. At this point you are ready to reinstall the seat.
23) Before you put the seat in the car reattach the seat belt first. (Ask me how I know)
24) You can now reconnect your power harness to the seat and bolt it back to that beautiful carbon tub that is barely exposed where the seat rails meet the floor board. HINT! get all four bolts screwed in but not tightened before you torque them down, this makes it easier to shift the seat a little bit as you get each bolt back in place.
25) Congratulations! You just saved some bucks and you also are now part of an elite 'Secret Society' of McLaren Do-It-Yourself'rs!
note - (the pictures below may not be in chronological order)
DIY - Replace Passenger Seat Airbag Occupancy Sensor
Working time: 4 hours total. That included a one hour trip to Walmart to purchase a 10.00 rivet gun necessary for the project (and some eggs). It also included 30 minutes as a side project to repair a fiddly "height up/down" switch on the same seat as well. This DIY was written from memory so please don't blast me if i left a step out.
I have seen on the Forum that this job has been quotes as high as 5k to repair. I personally was quoted 10 hours labor and at 150.00 an hour that's 1,500.00 that I feel like I could save if I went the DIY route. I will still have to pay homage to 'Mother McLaren' to reset the light once I'm finished, but that's only one hour of labor.
So I bought the Passenger Seat Airbag Occupancy Sensor repair kit from the dealer for around 200.00 and got to the task of doing it myself around 9:00pm last night. This was my first time tackling a McLaren seat, but I was actually surprised that it was not very difficult to take apart and reassembly.
Prior Lesson Learned working on a McLaren! (I learned this reading McLaren Life)- If you ever intend to unplug a seat, the rear view mirror, most any Body Control Module, the Airbag Module... (well you get the point), then you should first disconnect the battery to avoid a 150.00 visit to the dealer to have your airbag light turned off.
Because my airbag light is already on, I did not take this precaution, and leaving the battery connected made it easier to move the seat back and forth during removal and re-installation.
1) Remove the 4 bolts holding the passenger seat using a Torx T40. leave the power cord connected to the back of the seat while you do this so you cna move the seat around.
2) Remove the seat completely from the car. It will come out a couple of different ways, the important thing to consider is to protect the center console and the dash from the metal seat rack as you put the seat in and out of the car. We are working to make the car better, so let's not make any mistakes like scratching that beautiful dash!
PS- Be sure to keep a mental note of you movements and the seat orientation as you are removing it, installation will be the reverse of this movement so don't forget how you did it.
3) Once the seat is out of the car, remove the Seat Belt from the seat using a 15mm Socket. I recommend to take a picture of the belts orientation (twist of the belt) before removal so you can reinstall it correctly the first time you put it all back together.
4) Move your work area to a nice relaxing air conditioned area. For me the perfect spot was the living room rug. No worries of scratching the seat back or the leather, and I told my wife we were still having family time and I was not just working on my cars again.
5) Open your Occupancy Sensor repair kit and lay out all of the parts. you will not need everything, primarily you will not use the new wiring harness, so set it aside and just focus on using your existing harness.
6) Take more pictures of everything under the seat and how it is all connected before the tear down. This will ensure reassembly will be easy if you forget where something goes. Plus pictures give you bragging rights when you tell your friends you have zero fear at tearing apart things that cost over a quarter of a million dollars.
7) unplug all of the electrical connectors under the bottom of the seat. You do not need to unplug the two motors that have cables driving the seat forward/reverse track.
8) Using a Phillips head screw driver remove the large ECU under the seat, then remove the electric "Seat Control Unit" using a Torx T20 tool.
9) Use a flat tipped screw driver to gently pry the wiring harness off the seat bottom.
10) Once you have everything disconnected from the seat bottom you will see two silver clips on the seat bottoms "pivot points". You need to pry both of those clips off and then you can remove the only two Allen Head bolts that are screwed directly into the seat bottom. At this point you can remove the seat bottom from the seat frame.
Random Interesting Point: I weighed my heavy electric seat and it was approximately 37 lbs (wish I has 675LT light weight seats!)
11) Working on the seat bottom itself completely removed from the metal seat frame, use a medium size flat tip screw driver to pry up the plastic edge sewn to the leather that is pushed in to the perimeter of the plastic seat bottom (see pics for a better idea of this step)
12) IMPORTANT - Once you pry up the plastic edge sewn into the entire perimeter of the leather, you will notice approx 20 metal clips all around the plastic seat frame. Go ahead NOW and transfer all of those clips to the same locations on your new seat bottom. If you don't, the leather will not 'stay put' on the new seat bottom (Ask me how I know. LOL)
13) You should have the leather free from the the seat bottom. Now flip it over and using your flat tip screw driver to gently pry the U shaped plastic clips on each side of the foam cushion where it is connected to the back side of the leather. Don't worry if you accidentally tear the U shaped clips out of the foam cushion because the old one is destined for the garbage bin anyway. In the center of the seat you will find Velcro is used to give the seat contour lines something to keep attached to. Just pull up, and the leather should be freed of the old seat bottom. Remember to snap a few pics to brag to your buddies later. I tried it with my spouse, but she just rolled here eyes. ��
14) Take a few minutes and study the old seat. It has two layers of electronics glued to the foam. The top layer is the Airbag sensor. the layer under that is the seat heater mat. The seat heater mat is gray colored and the occupancy sensor is white. Please study the alignment of how they are glued down carefully because you will only have once chance to stick yours on correctly. I noticed that there are four distinct panels in the seat cushion and the sensors have to be flexible in between each panel. In these ares you will need to 'bunch' the material closer rather than just laying it out flat. Please review my pictures if you are unsure of what I'm describing.
15) Install the larger gray seat heater mat first. Only peel off the tape backing on each area you are working.
16) Now install the smaller white seat occupancy sensor mat on top of the seat heater mat. Only peel of the tape backing on each area you are working on. Be sure your wires go thru the hole in the seat bottom just like the old unit we removed.
17) Once both electric mats are glued to the cushion, we can now reinstall your leather cover. Start by inserting the white Velcro seat contour areas in the middle, then snap in the plastic clamps on each side. Next flip the seat bottom upside down and push the plastic edge sewn to the leather back into the perimeter of the plastic seat bottom.
18) Assembly the two new small ECU boxes received with your kit to new the metal bracket received with the kit. Just copy how the old one was set up on the old seat.
19) Using your rivet gun and the three supplied rivets, attach your new rectangular metal bracket to the seat bottom. You will find a few new plastic bushings that snap into the seat bottom at the two pivot points and also at the Allen head bolt points.
20) you can now reconnect the new seat bottom to the seat frame. Once aligned properly you can snap the metal C-clips back to the pivot points and then bolt back in the two Allen Head screws.
21) reattach all of your wiring harness clips, attach the electric "Seat Control Unit" and the seat switch assembly.
22) DOUBLE CHECK YOUR WORK. At this point you are ready to reinstall the seat.
23) Before you put the seat in the car reattach the seat belt first. (Ask me how I know)
24) You can now reconnect your power harness to the seat and bolt it back to that beautiful carbon tub that is barely exposed where the seat rails meet the floor board. HINT! get all four bolts screwed in but not tightened before you torque them down, this makes it easier to shift the seat a little bit as you get each bolt back in place.
25) Congratulations! You just saved some bucks and you also are now part of an elite 'Secret Society' of McLaren Do-It-Yourself'rs!
note - (the pictures below may not be in chronological order)