
OLED Climate Control Replacement Walkthrough
Tools Needed:
T-30 Torx bit
T-10 Torx bit
3/8" Rachet
Dental pick
Fingernails or plastic mini prybar
Order part# 11M3219CP (one for each side) from McLaren. I paid $85 each.
1. Pop the speaker grill straight out with your fingernails or plastic mini prybar.
2. Locate and remove the one and only torx screw holding in the panel from underneath. It is a T-30 torx screw.
3. Push up from the inside to pop out the climate control module. If you loose one of the clips, it may have fallen near the speaker. Locate and reinstall any missing clips. Disconnect the wiring harness, it has a thumb clip on one side, so don't just pull on it.
4. Remove the four T-10 torx screws to pop off the carbon fiber or aluminum/plastic fascia.
5. Using a dental pick, pop off the black retainer covering the OLED.
6. Using a dental pick, pry at each of the four corners of OLED screen a little at a time. Concentrate on the left side of the screen where the connector is underneath.
7. Install replacement screen by using a small tool or the T-10 torx bit to lightly press on the corners of the green circuit board. DO NOT push on the OLED screen. Once connected, remove the plastic OLED protective material and reinstall the OLED cover and fascia. Reinstall the four screws.
8. Slightly bend the four silver retainer clips out just a tad. Reinstall the wiring harness and test the operation before putting everything back into place.
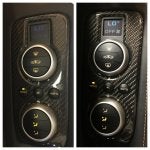
9. Enjoy your bright screen!
Tools Needed:
T-30 Torx bit
T-10 Torx bit
3/8" Rachet
Dental pick
Fingernails or plastic mini prybar
Order part# 11M3219CP (one for each side) from McLaren. I paid $85 each.
1. Pop the speaker grill straight out with your fingernails or plastic mini prybar.
2. Locate and remove the one and only torx screw holding in the panel from underneath. It is a T-30 torx screw.
3. Push up from the inside to pop out the climate control module. If you loose one of the clips, it may have fallen near the speaker. Locate and reinstall any missing clips. Disconnect the wiring harness, it has a thumb clip on one side, so don't just pull on it.
4. Remove the four T-10 torx screws to pop off the carbon fiber or aluminum/plastic fascia.
5. Using a dental pick, pop off the black retainer covering the OLED.
6. Using a dental pick, pry at each of the four corners of OLED screen a little at a time. Concentrate on the left side of the screen where the connector is underneath.
7. Install replacement screen by using a small tool or the T-10 torx bit to lightly press on the corners of the green circuit board. DO NOT push on the OLED screen. Once connected, remove the plastic OLED protective material and reinstall the OLED cover and fascia. Reinstall the four screws.
8. Slightly bend the four silver retainer clips out just a tad. Reinstall the wiring harness and test the operation before putting everything back into place.
9. Enjoy your bright screen!